|
|
| (37 intermediate revisions by 20 users not shown) |
| Line 1: |
Line 1: |
| {{rewrite|comment=need below-maximum stat gain unit sizes}}
| | [[File:Tavern0.gif|center]] |
|
| |
|
| <CENTER>[[Image:tavern.gif]]</CENTER>
| | '''The Typical Tavern''' can be found in [[The Distant Woods]] after an adventurer has reached level 3 and returned [[mosquito larva]] to the [[The Council of Loathing|Council of Loathing]]. |
|
| |
|
| [[The Council of Loathing]] sends you on a [[Typical Tavern Quest|quest]] to [[The Typical Tavern]] in [[The Distant Woods]] in order to take care of a bit of a rat problem.
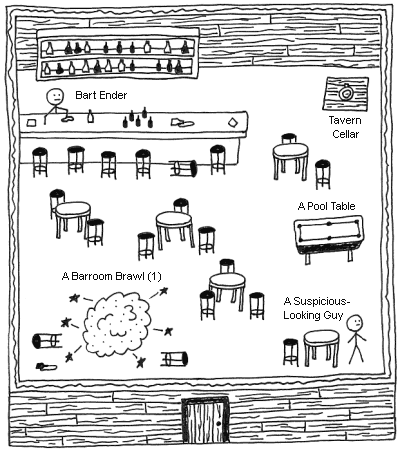
| | <imagemap> |
| | File:Typicaltavern.gif|center |
|
| |
|
| You must have a minimum of 100 meat to adventure at the Tavern post-quest. If you have 99 meat or less, you receive the following message:
| | desc none |
| | rect 175 392 235 447 [[The Distant Woods|Exit]] |
| | rect 37 83 131 130 [[Bart Ender]] |
| | rect 24 266 194 375 [[A Barroom Brawl]] |
| | rect 277 290 372 372 [[A Suspicious-Looking Guy]] |
| | rect 284 194 371 271 [[The Pool Table|A Pool Table]] |
| | rect 314 69 378 143 [[Tavern Cellar]] |
| | </imagemap> |
|
| |
|
| <center>Why go to the tavern if you can't afford to drink?</center>
| | It contains: |
| | *[[Bart Ender]] |
| | *[[The Pool Table|A Pool Table]] |
| | *[[A Barroom Brawl]] |
| | *[[Tavern Cellar]] |
| | *[[A Suspicious-Looking Guy]] |
|
| |
|
| ==Pre-Quest== | | ==Notes== |
| | *In a [[Zombie Slayer]] run, the Brawl is replaced with A Quiet Corner: |
| | :This is the first time you've ever seen this corner of the room without a constant brawl taking place in it. It's so quiet, it's frankly a little eerie. Spooky. Creepy. |
|
| |
|
| {{Adventure|name=drunken rat|drops=[[rat whisker]], [[rat appendix]]|stat=3|meat=8-10|image=rat.gif}}
| | :The dead bodies don't help much with that, mind you. |
|
| |
|
| ==Post-Quest==
| | [[Category:Locations|Typical Tavern]] |
| | |
| If you are either a [[Teetotaler]] or an [[Oxygenarian]], attempting to adventure here will get you this message:
| |
| <CENTER>You cannot adventure in the Tavern while you're on the Path you're on.</CENTER>
| |
| ----
| |
| With the exception of Len Scrafters, all adventures either take away ''n'' substat points, give you 2 * ''n'' substat points, or give you 5 * ''n'' substat points. The value of ''n'' falls within a range which depends on your level, but maxes out at level 15. At that level, ''n'' is equal to 50, so you can either lose 50, gain 100, or gain 250.
| |
| | |
| ''Note: This table is a work in progress, so you may get values outside the ranges listed here. If you do, please update the table (but beware of moon phases).''
| |
| | |
| <center>
| |
| <TABLE CELLPADDING=3 CELLSPACING=0 BORDER=1px>
| |
| <tr style="background-color: #EFEFEF">
| |
| <td>'''Level'''</td>
| |
| <td>'''''n'''''</td>
| |
| <td></td>
| |
| <td>'''Level'''</td>
| |
| <td>'''''n'''''</td>
| |
| <td></td>
| |
| <td>'''Level'''</td>
| |
| <td>'''''n'''''</td></tr>
| |
| | |
| <tr><td>3</td><td>3-4</td>
| |
| <td style="background-color: #EFEFEF"></td>
| |
| <td>8</td><td>28</td>
| |
| <td style="background-color: #EFEFEF"></td>
| |
| <td>12</td><td>?</td></tr>
| |
| | |
| <tr><td>4</td><td>?</td>
| |
| <td style="background-color: #EFEFEF"></td>
| |
| <td>9</td><td>?</td>
| |
| <td style="background-color: #EFEFEF"></td>
| |
| <td>13</td><td>?</td></tr>
| |
| | |
| <tr><td>5</td><td>12</td>
| |
| <td style="background-color: #EFEFEF"></td>
| |
| <td>10</td><td>?</td>
| |
| <td style="background-color: #EFEFEF"></td>
| |
| <td>14</td><td>?</td></tr>
| |
| | |
| <tr><td>6</td><td>11-16</td>
| |
| <td style="background-color: #EFEFEF"></td>
| |
| <td>11</td><td>?</td>
| |
| <td style="background-color: #EFEFEF"></td>
| |
| <td>15</td><td>50</td></tr>
| |
| | |
| <tr><td>7</td><td>?</td><td colspan=6></td></tr>
| |
| | |
| </table>
| |
| </center>
| |
| | |
| For those who want to hit max drunkenness every night, don't mind losing a big chunk of adventures, and don't want to bother getting materials for drinks, the tavern is a great place to finish off the day (just as in real life). Although some hate the risk, the rewards for doing this are substantial; after the very low levels, the big win scenarios here get over 100 stat gain per adventure, which (if you're not filthy rich) simply can't be beat.
| |
| | |
| All stat gains are subject to the phases of the moons, so the maximum gain you can get is 375 stat. (stat losses aren't boosted by moon phases)
| |
| | |
| Losing adventures cost 100 meat, the minor wins cost 50 meat, and the major wins are covered by other bar patrons.
| |
| | |
| There are rumors that wearing [[beer goggles]] reduces the odds of getting a losing adventure, and that having [[Ode to Booze]] on increases the odds of the big win scenarios. Both are unconfirmed.
| |
| | |
| ==Math==
| |
| Assuming the three different scenarios (loss, win, big win) happen equally frequently, and ignoring the Len Scrafters adventure, the average payout of an adventure is as follows:
| |
| | |
| [(loss) -''n'' +1drunk -100meat + (win) 2''n'' + 1drunk -50meat + (bigwin) 5''n'' + 2drunk ] / 3 adventures =
| |
| [6''n'' -150meat + 4drunk] / 3 adventures =
| |
| | |
| An average of 2''n'' stat gain, -50meat, and 4/3 drunkenness per adventure.
| |
| | |
| Wearing goggles or hearing the Ode does seem to tip the balance in favor of wins, and this makes tavern crawls even more dramatically effective.
| |
| | |
| Finally, Len is there too, and everyone loves beer lenses.
| |
| | |
| With Len, and spreading this out over 10 adventures:
| |
| | |
| -3''n'' + 3drunk -300meat +6''n'' + 3drunk -150meat +15''n'' +6drunk + [[beer lens]] / 10 adventures =
| |
| 18''n'' + 12drunk -450meat + [[beer lens]] / 10 adventures =
| |
| 1.8''n'' + 1.2drunk -45meat + 0.1[[beer lens]] per adventure
| |
| | |
| On a stat day, only one stat type gets boosted, so looking only at stats:
| |
| -3''n'' + (no-boost)4''n'' + (boost)3''n'' + (no-boost)10''n'' + (boost)7.5''n'' / 10 adventures =
| |
| 21.5''n'' / 10 adventures =
| |
| 2.15''n'' per adventure
| |
| | |
| {{Adventure|name=A guy walks up to you at a bar|drops=[[beer lens]]|stat=None|meat=None|image=scrafters.gif}}
| |
| | |
| {{Adventure|name=Bad Ideas Abound|drops=None|meat=<font color=red>-100</font>|stat=<font color=red>minus ''n''</font> (Muscle)|image=goblinaxe.gif}}
| |
| *1 drunkenness
| |
| | |
| {{Adventure|name=Over the Top|drops=None|stat=plus 2 * ''n'' (Muscle)|meat=<font color=red>-50</font>|image=gnollbeer.gif}}
| |
| *1 drunkenness
| |
| | |
| {{Adventure|name=Kegstand!|drops=None|meat=None|stat=plus 5 * ''n'' (Muscle)|image=fratboy.gif}}
| |
| *2 drunkenness
| |
| | |
| {{Adventure|name=Some Enchanted Evening|drops=None|meat=<font color=red>-100</font>|stat=<font color=red>minus ''n''</font> (Mysticality)|image=angrymage.gif}}
| |
| *1 drunkenness
| |
| | |
| {{Adventure|name=Stupid Drunk Tricks|drops=None|meat=<font color=red>-50</font>|stat=plus 2 * ''n'' (Mysticality)|image=martini3.gif}}
| |
| *1 drunkenness
| |
| | |
| {{Adventure|name=Karmic Darts|drops=None|meat=None|stat=plus 5 * ''n'' (Mysticality)|image=dartboard.gif}}
| |
| *2 drunkenness
| |
| | |
| {{Adventure|name=Unmoxed|drops=None|meat=<font color=red>-100</font>|stat=<font color=red>minus ''n''</font> (Moxie)|image=lady.gif}}
| |
| *1 drunkenness
| |
| | |
| {{Adventure|name=Moxious!|drops=None|meat=<font color=red>-50</font>|stat=plus 2 * ''n'' (Moxie)|image=lady.gif}}
| |
| *1 drunkenness
| |
| | |
| {{Adventure|name=Knock Knock...|drops=None|meat=None|stat=plus 5 * ''n'' (Moxie)|image=fratboy.gif}}
| |
| *2 drunkenness
| |
| | |
| [[Category:Locations|Typical Tavern, The]] | |


